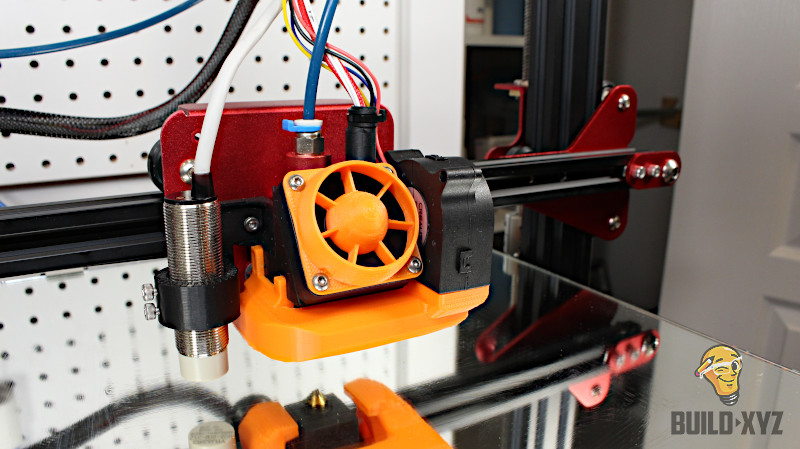
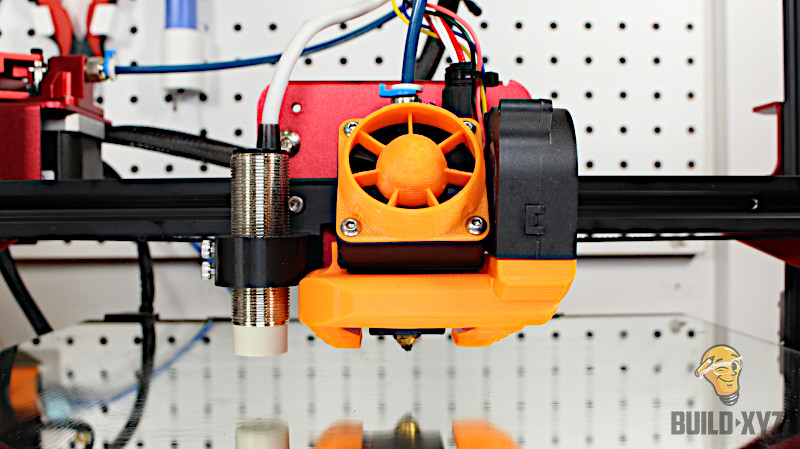

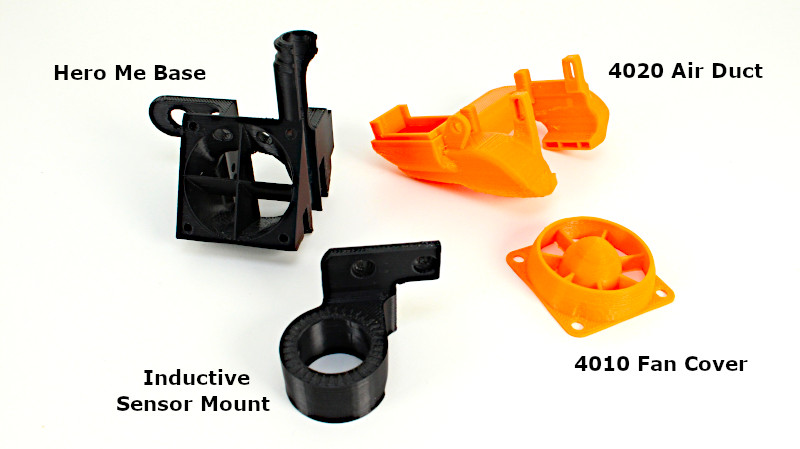
Who can deny the awesome aesthetics and cooling power of an upgraded cooling fan? Not me! I was so excited when I stumbled upon the CR-10S Pro Hero Me fan upgrade design by user mediaman. For those who are not familiar, the Hero Me is designed to be modular system and once a base has been designed for your printer, you can bolt on any configuration of Z probes and cooling fans. I decided to upgrade to the Hero Me system while maintaining all the original CR-10S cooling fans.
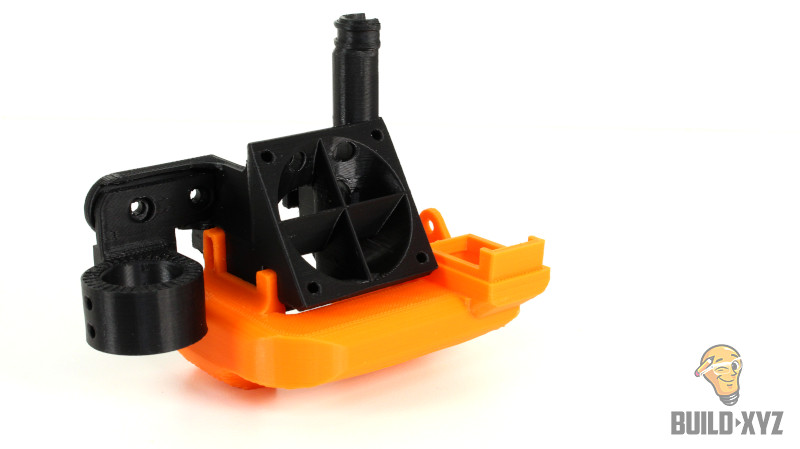
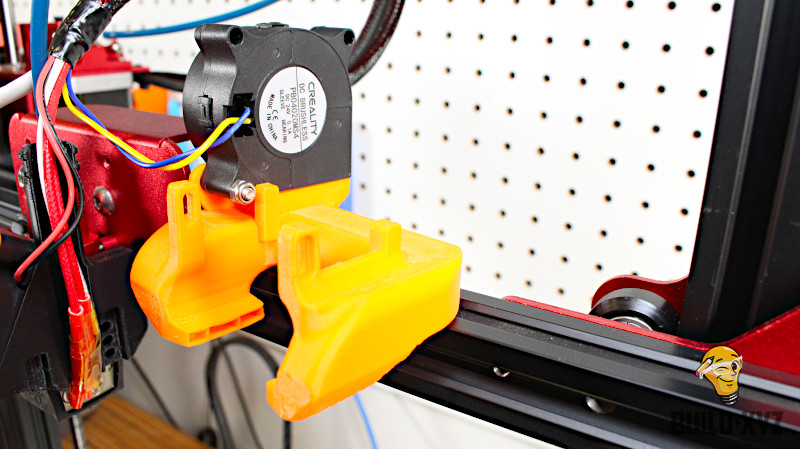
I was just about to CAD up a 4020 mount to use the stock 24VDC fan when I saw user Stefire already made this one. This sliced view shows how the fan duct directs the airflow around to the tip.

I have slightly modified the clearances on the Hero Me base and added holes to access the hotend mounting bolts. I have also made adjustments to the inductive probe mount as the mounting hole needed to enlarged for my stock probe.
UPDATE: The original author (mediaman) of these file has now included these changes in the latest revision which again can be found here.
I will include everything I used into a single Thingaverse, while citing the original sources to make it easy for people to find. All that is need to complete this mod are:
- 2 – M3 x 8.00mm bolts to mount the Hero Me base
- 2 – M3 x 5.00mm bolts for the Inductive Z probe
- 3 – M3 nuts
I highly recommend picking up an M3 and M4 assorted hardware set off Ebay to make this and future upgrades easier, just head over to Ebay and search “M4 socket set” and enrich your life. You will of course need the STLs file for the following 4 parts which can be found here.
Go ahead and loosen the belt tensor/pulley mount, this will provide enough slack to remove the belt from the X gantry plate.

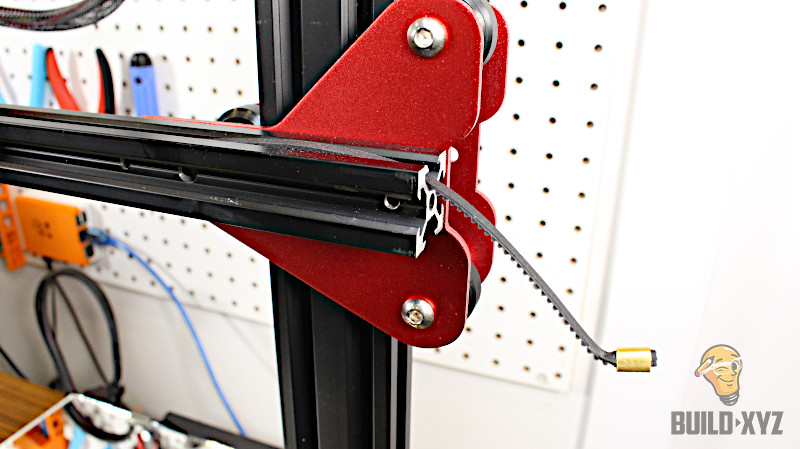
With the belt removed, you can loosen the eccentric nut with the provided wrench and loosen the top two rubber wheels with an Allen key and a 10mm wrench. The gantry plate can then be removed and disassembled. Now install the Hero Me base and probe mount of your choice onto the gantry plate using the M3 nuts and bolt acquired. reverse the steps to mount the gantry plate and tighten the eccentric wheel and belt.

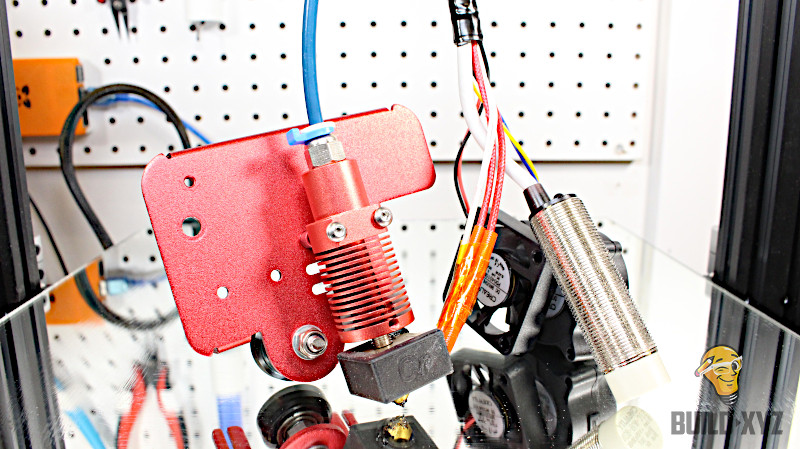
Mount the air duct using a single M3 nut and bolt and feed all the wires through to provided channel. I actually thread the nut and bolt in the reverse direction that what is shown in the picture below. The air duct has a solid friction fit and I felt no need to secure it with additional hardware.
Firmware Updates
With everything all fitted up and looking great, the is one small change required in firmware to update the printer to use the new offsets for the Z probe mount. mediaman has been kind enough to provide a list of these new offsets for all configurations.
- Stock ABL & EZABL for the Single 5015 fan duct is: -45 X and -9 Y
- Stock ABL & EZABL for the Dual 5015 fan duct is: -50 X and -9 Y
- BLTouch & the Single 5015 fan duct is: -40 X and -13 Y
- BLTouch & the Dual 5015 fan duct is: -46 X and -13 Y
We will be using the option for “Stock ABL & EZABL for the Single 5015 fan duct is” and our offsets will be -45 X and -9 Y. The new offsets are applied in configuration.h in the Marlin source code. This process will require you to compile the Marlin source in the Arduino IDE and flash the new changes over USB.
Factory Firmware flashing
Sticking with the Creality provided firmware and just updating the offsets in the configuration.h file is an option.
The factory CR10S-Pro source code can be found here.
The following updates should be applied to configuration.h before compiling and uploading to your printer:
Tiny Machines Firmware flashing
If you haven’t already switched over to the Tiny Machines firmware, please do so immediately, it’s way better! Tiny machines has also released their source code and with a little git-fu you can compile and make changes such as X and Y offsets. I won’t cover installing Git here as the internet is pretty good at explaining that for your specific OS environment. You can browse the Tiny Machines GitHub repo here, or follow along on the command line to download the proper source tree.
List all the available branches.
Now we can switch to the “Creality_DWINTest” branch which will be for a stock CR10S-Pro.
Note that there will a “CR-X Screen” folder which contains the screen firmware to be flashed via the internal SD card (Which was already been covered by Teaching Tech here). Open up the Marlin.ino in the Arduino IDE. You can now update the follow offsets in configuration.h
You should be good-to-go after compiling and flashing the new firmware!
hi – im about to install this. cant wait. 🙂
just a quick question. how can i inject the code into the CR10sPRO?
thanks!
Hi Paul,
In order to update the new offset you will need to:
1. Download the Marlin source code from the Creality web site
2. Download the Arduino IDE
3. Update the configuration.h in the Arduino IDE as per the notes above in this post
4. Flash the new firmware running on the CR10S Pro.
How can you change offset if using tiny machines firmware? I am only finding the hex file and not source for the tiny machines firmware. thanks!
I believe Tiny machines only publish their compiled binary and not their source code unfortunately. This means you’ll have to revert the Creality publish Marlin source code and compile yourself as I did.
Tiny Machines made some swell changes but they did not release it in an editable format.
https://www.printedsolid.com/blogs/news/installing-marlin-1-1-6-on-your-cr-10s-with-mesh-bed-leveling hopefully this will get you started its what i am using to try and get this mod to work with the offsets
Is this for the Pro?
This is for the CR10S-Pro yes.
Would love to see the finished work. I tried this and it does not work on my Pro. I have not seen any pic of the finished job. Maybe I could see where I went wrong if I did go wrong. Its like my Pro is not the same as the others. My sensor wire is 3″ short wont reach the mount, the duct blows directly on the nozzle when its down as far as it can go. Was real hard to get the base on. Had to fight it. Just seems like my printer is from Hell!
“I have not seen any pic of the finished job”
There are pictures of my complete build in this post, is there a particular angle you are looking for?
I know these printers can be finicky.
could you give a better guide on using arduino to set these offsets i have been trying to find someone who is willing to help but no one is i tried the ender three video to no success
I may do a video on this one day but it is essentially like flashing any Marlin/RAMPS board via the expose USB plug on the printer.
I got the firmware from Tinymachine and its perfect except its a hex file already so how can I change the offset settings???
See my reply to Jason below.
Hello! Very nice model and I make it before my printer arrived… I have the same question about the X_PROBE_OFFSET_FROM_NOZZLE – If I use a tinymachines firmware, that was in hex file – can I do something?
Ask nTiny Machines to release their source on GitHub or maybe even just their Configuration.h! Then I can help with the rest 🙂
TinyMachines firmware source for CR10s Pro can be found on page :
https://github.com/InsanityAutomation/Marlin/tree/Creality_DWINTest.
Under this tree, Marlin folder has the source code. You can make the necessary changes on these files 🙂
Nice find! thank you for this!
So it is possible to just change the Configuration.h mentioned above for the TinyMachines Firmware? Can i just add the line you provided? But how do i proceed from there? How can i get these changes into a hex file?
Yes i am very new to this and have no clue where to start. I just dont want to crash my Printer by doing stupid firmware mistakes.
I can fully understand that to people who already have a clue of what to do your brief instructions above may be helpful. The problem is: there are people (including me) that have no clue what you are talking about. I recently tried to understand the basics of this arduino stuff…but all Tutorials i found just dont start at zero.
I dont want you to just solve the problems i run into for me, maybe you can give some hints on where i can find solutions for this myself.
Hello mutralisk , I was wondering if you solved your configuration.h file tweaking issue ?
I’m on the same stage as you, no idea what to change and activate to get a working firmware.
I’ve updated to the firmware section of this post, perhaps this solves your issue?
Check the firmware updates section of this post as it has been updated, I have also switched to Tiny Machine’s firmware!
Is everyone printing these parts in ABS?
I printed them all in ABS but I’m sure PLA would be fine.
Will this work on a CR-10S Pro with Microswiss Hot end?
Sorry, I have no idea about that.
Hey everyone, I am going to try and flash my printer tonight with the offset. Mehmet, I followed the link you posted and found the parameter I need to change in the config file. I’ve never flashed a printers firmware before though. Do we only need that config.h file or the entire source code? If it’s the entire source code where do I download that from the GitHub link?
You’ll need the entire Arduino project with all the source files (one of which is the configuration.h file) in order to change and flash the firmware.
Why exactly do I have to make changes to the firmware?
To account for the new probe offset from the extruder nozzle.
Hi,
I have a question:
In my Configuration.h file, I have two sections where I can change offsets. Which one should I edit?
https://imgur.com/pursnTl
Those sections depend on what machine and what probe you are using. If yours is a CR10S-Pro and ABL_NCSW refers to the stock CR10S-Pro ABL inductive probe. You would want to edit the section at line 1175:
#if ENABLED(ABL_EZABL) || ENABLED(ABL_NCSW)
#define X_PROBE_OFFSET_FROM_EXTRUDER -45 // X offset: -left +right [of the nozzle]
#define Y_PROBE_OFFSET_FROM_EXTRUDER -9 // Y offset: -front +behind [the nozzle]
#define Z_PROBE_OFFSET_FROM_EXTRUDER 0 // Z offset: -below +above [the nozzle]
#endif
Hi Adrian, and thanks for your reply.
I have a Creality CR-10S Pro with the original extruder and sensor.
As I said, I have two sections that look exactly as you describe.
Please see my new screenshot: https://imgur.com/05Rr5wG
Are you 100% sure that it is line 1177+1178 that needs to be changed?
When I measure the position of the sensor with the original bracket, the position is X-27 Y-0
This seems to be right with the data on lines 1189+1190, not on lines 1177+1178.
Are you sure the 1189+1190 lines should not be changed instead?
I still believe you want to change lines 1177-1178 as they follow the preprocessor directive:
#elif ENABLED(MachineCR10SPro) && ENABLED(HotendStock)
Which means “if CR10Pro was defined”. Which it was in line 25:
#define MachineCR10SPro
So lines 1189-1190 are never actually compiled into you firmware.
What are the values in case BLTouch is used?
All the offsets can be found in the description here: https://www.thingiverse.com/thing:3433619
Hi,
Can you explain how to fix the base with a M3 x 8 mm while the original screws are more than 8mm and we add a thickness ?
.
Hello,
Thank you for this tutorial.
Could you maybe provide me with some information how to use the newest Marlin version from tiny machines (https://github.com/InsanityAutomation/Marlin/tree/CrealityDwin_2.0)?
I am new to 3D printing and I am now a little bit lost.
Does anyone know what the original factory offsets are if you need to switch back to the stock setup?
Thanks cant wait to print the mods.
Can you just use m851 to change the offsets instead of reflahing?