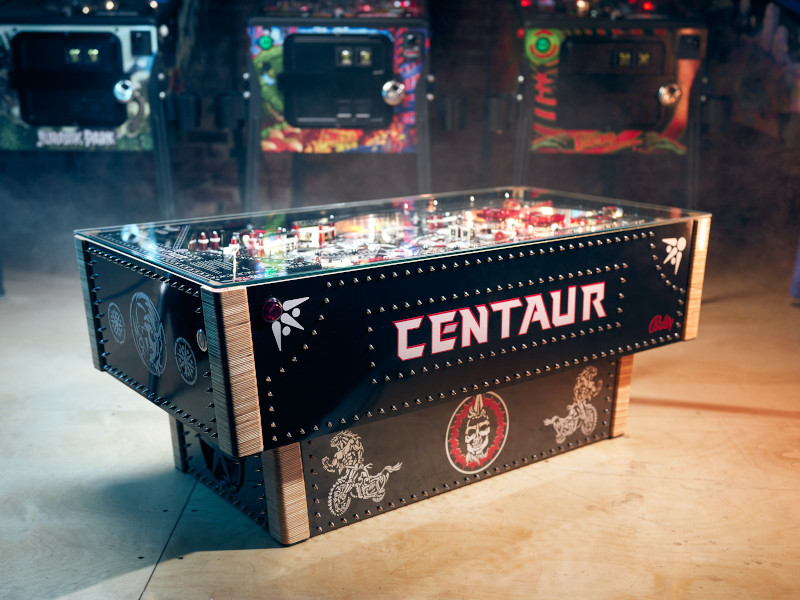
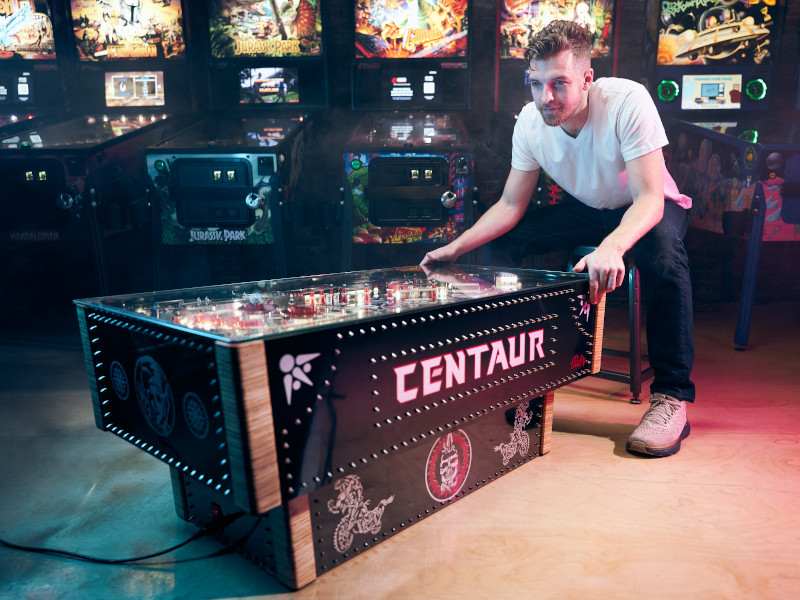
Pinball Coffee Table You Can Actually Play!


Welcome to the Pinball Coffee Table (Pintable) project page!
You’ve come to the right place if you’re curious about the technical details of how the Pinball Coffee Table came to be!
There are some cool things that were intentionally left out of the video as it would have made it too long for most viewers.
This post will provide more information about certain features, and explain the process for how they were accomplished.
What Was I Thinking?
I’ve always loved Pinball but I’ve never had the space in my home for a full-sized machine.. A few years ago, I started noodling on the idea of a pinball machine built into a coffee table. At first, I considered the low-cost and low-effort approach of taking a damaged pinball machine, gutting the playfield, and making a cool looking coffee table (that wouldn’t actually work).
Then I thought about how much more awesome it would be if it worked and all the interesting engineering challenges that I would need to win to make it happen. Plus, it seemed it had never even been done before. The idea started to grow on me and I started considering the details. The table would have to be 18 inches or lower to be considered a functional coffee table. Also, I knew that if I was going to be spending this amount of time on a custom pinball machine project, I had to start with a great game…
Pinball Machine Selection
Before embarking on this long-haul project, I did a lot of research with my good friend Angelo over at Pinball Vancouver. I knew I didn’t want to put a bunch of work into a game that wasn’t fun or engaging. I was also adamant on using a single level game as I wanted to make sure that that the game was playable; most pinball machines – especially since the 90’s – use ramps and sometimes have additional playfields on an upper level. While these features are cool, I just didn’t have that kind of depth or time to take on that kind of challenge.
We concluded that an early solid-state game would fit the bill nicely. These are games released in the late 70’s to the late 80’s that began using solid state electronics. Previously, pinball machines were electromechanical and used large mechanisms and basic analog electronics to get the job done. Of the early solid state games, there are some titles that rise to top and that stand the test of time: Fathom, Eight Ball Deluxe, Black Knight, and Centaur to name a few.
Destroy Centaur
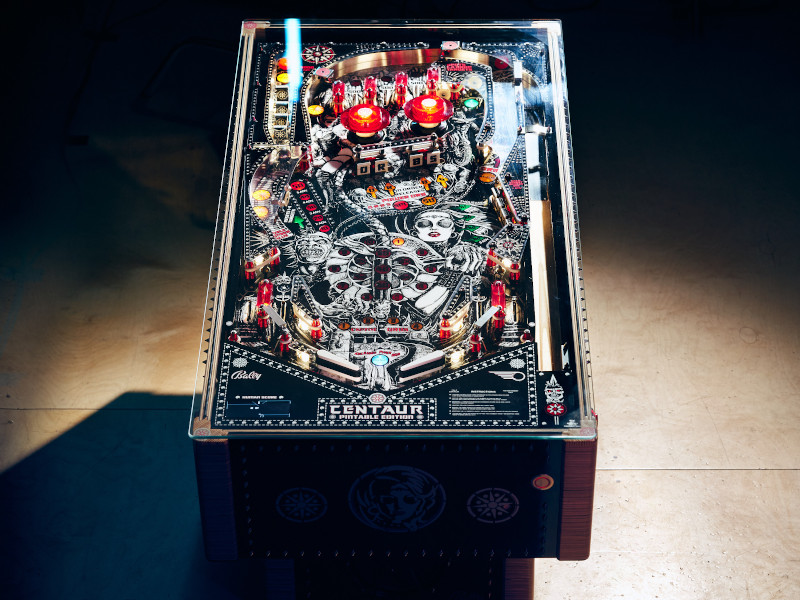
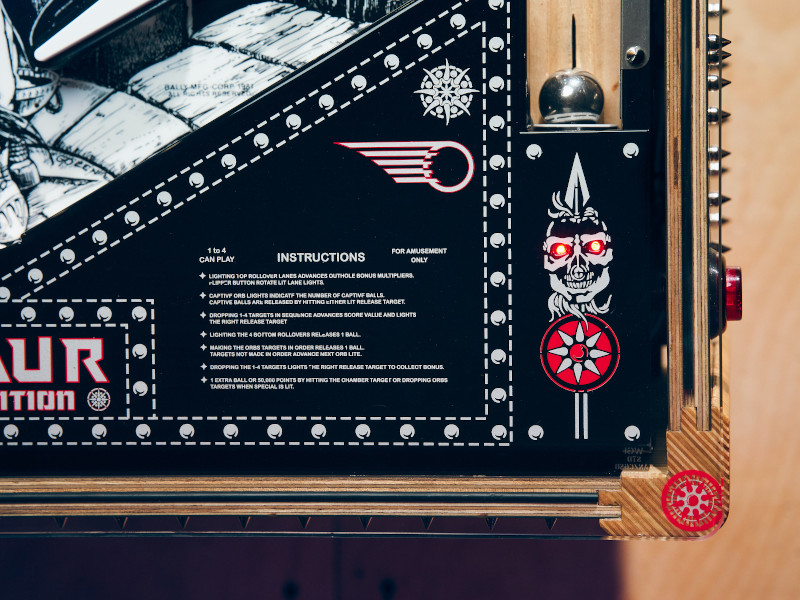
Centaur really grabbed my attention because of the artwork and the sound. The Pinball Coffee Table will mainly be a concept piece in the center of my living space, and as such, aesthetics are important In that regard,Centaur delivers. Paul Faris nailed the artwork with the original “Fantasy/Motorcycle” theme. The color palette is classy; covered almost completely in black, white, and red. Centaur is a single-level game which makes fitting it into a table an easier task than some multi- level games. That being said, despite being a single-level game, Centaur has a lot going on with a complex rule set.
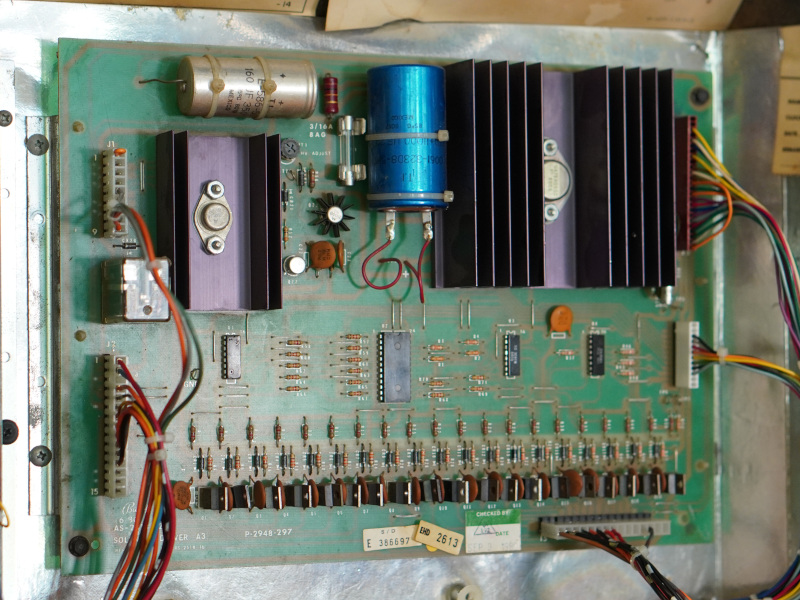
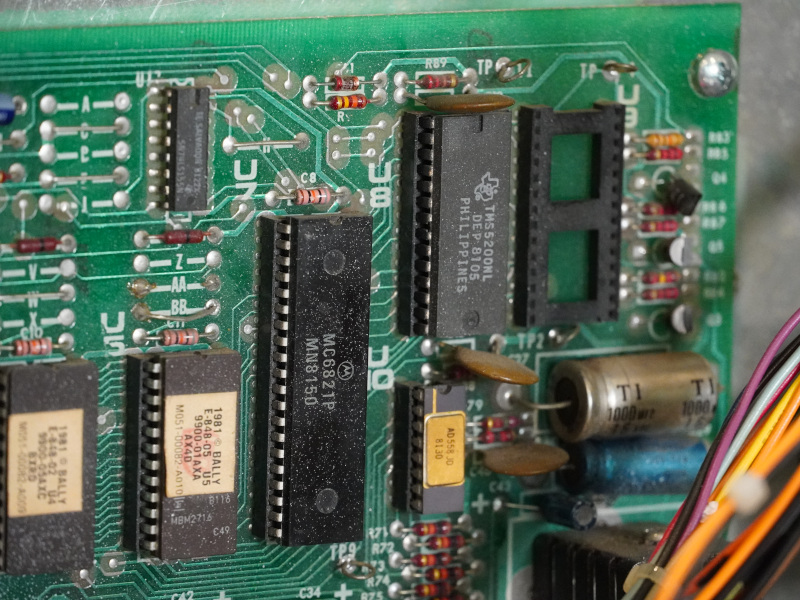
The sound in Centaur is special and one of the only games to have a dedicated “Say it Again” reverb board to create an echo effect. Sound is generated using a board aptly named “Squawk & Talk” which incorporates the venerable and obsolete TMS5000 speech generation IC from Texas Instruments. This was Texas Instruments public release for a very similar chip used in the original Speak & Spell. In fact, the sound board is the only original board still in the final game – though it has undergone an extensive rebuild.
Target Acquired
With the game selected, I just needed to find one for sale which is not an easy task. They normally come up a couple times a year on pinball forums, and shipping logistics were near impossible during the early days of COVID. This is where Angelo levelled up and convinced a local collector to part with his Centaur, which already had a new playfield and was in semi-working condition. While the playfield was beautiful, all the electronic boards had paint overspray, corrosion issues, and the whole thing smelled like an old ashtray.


Solid Plan
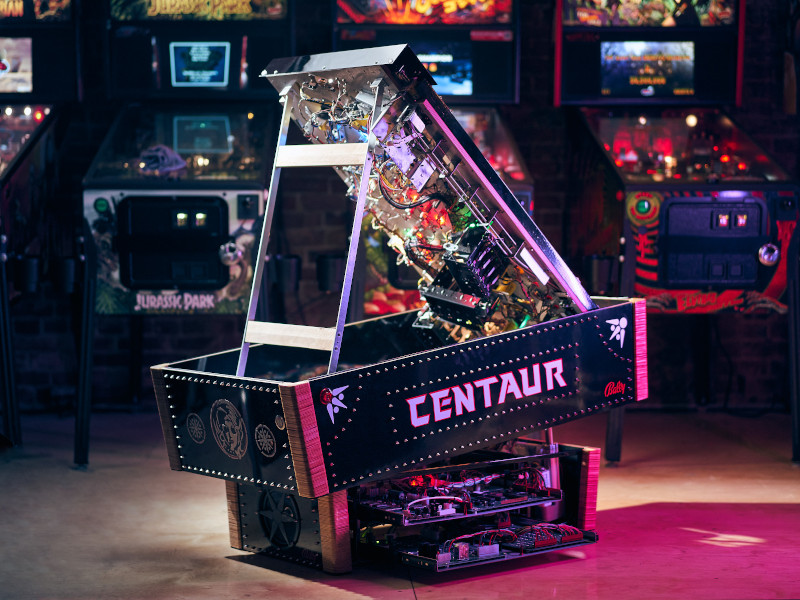
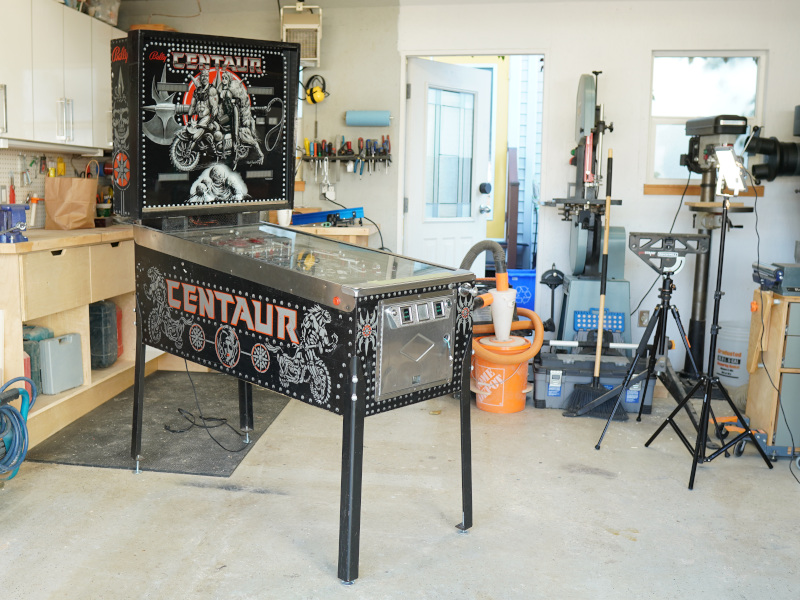
I spent a month practicing the game in a quasi-playable state, just trying to learn the machine and let some of my ideas percolate. Like any project of mine, it began in a computer, carefully modeling the existing components in Fusion360. The final dimensions of the finished product are 45”L x 22.5”W x 18”H. Coffee tables are generally no higher than 18″ so this was a design constraint.
Next, I developed solutions for the two major design challenges; if these two challenges can be solved, the rest are just details:
- A mechanism to get a 5° to 7° incline on the playfield, while still having a of a completely flat surface so that it can function as a coffee table.
- The backbox which normally houses the score displays won’t be in the final design, and that important information must still be made visible to the player.

Lifting The Table
I considered a few options for getting the required incline on the playfield. Normally, you can adjust the incline with threaded feet, which directly affects the speed of the ball. The standard incline on these games is 5° but I wanted to allow for up to 7°.
One approach to this problem involved no motors at all! Just lower the front of the playfield inside the cabinet. This approach presented a few problems. First, the automatic ball launch mechanism would require a lot of space and affect the table design negatively. Second, the flippers start to drop too far away from the players, making the play experience unenjoyable. Third, the flipper button would be visible from the inside and this would require notching the playfield to accommodate any future servicing.
Instead, I decided to keep the top glass and playfield parallel and lift the back of the cabinet up, while hinging the front. I hadn’t used linear actuators in any previous projects so I experimented with some inexpensive units first and they were junk! Progressive Automations ended up shipping me out 2 of their PA-09 Mini Industrial Actuators which I could finally put some trust in, these things are super well made and I was definitely impressed with the upgrade.
Decoding The Scores
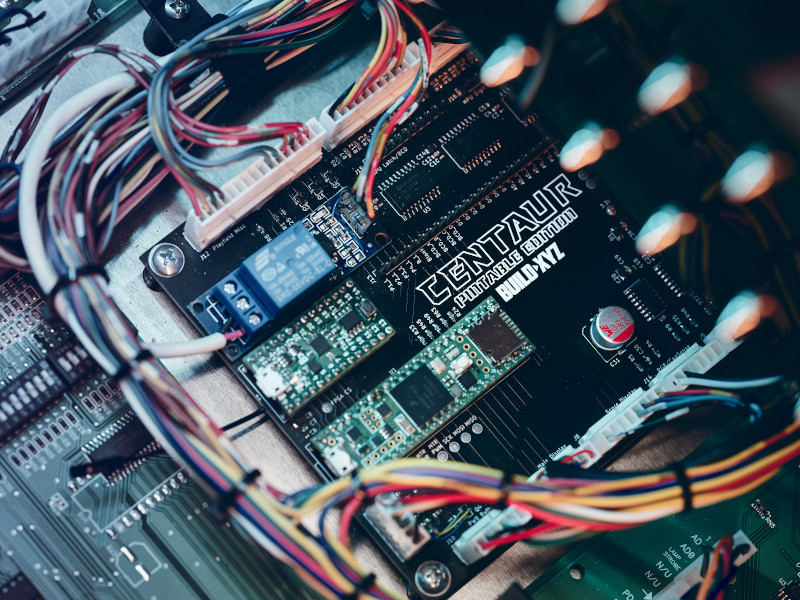
The original back box would need to be removed entirely to make way for the new coffee table form factor. The back box normally houses five 7-segment displays that show the players what their scores are, as well as the current ball count. I needed a way to capture all of this information and display it to the user.
After considering a few options, I decided to go with a Tiny FPGA BX board and some custom Verilog. FPGAs are amazing and they basically let you design your own chip using a Hardware Descriptive Language (HDL) such as Verilog. A custom SPI core was written along with some decoder logic to read 16 signals simultaneously. The Binary Coded Decimal (BCD) for each display position is then read asynchronously by a Teensy 4.1 microcontroller every time the score is updated.
Essentially, all this custom circuitry is required to “get in the between” the original MPU controller board and all the boards which control the displays, sounds, lights, and solenoids, then it also implements a bunch of added features.

The schematic grew to the point that it required a custom circuit board to reliably house all the components. A four-layer board was whipped up with KiCAD and took a few weeks to arrive direct from a Chinese board house. The components were then hand soldered and powered up in isolation to confirm I didn’t mess the board up.

Playfield Restoration
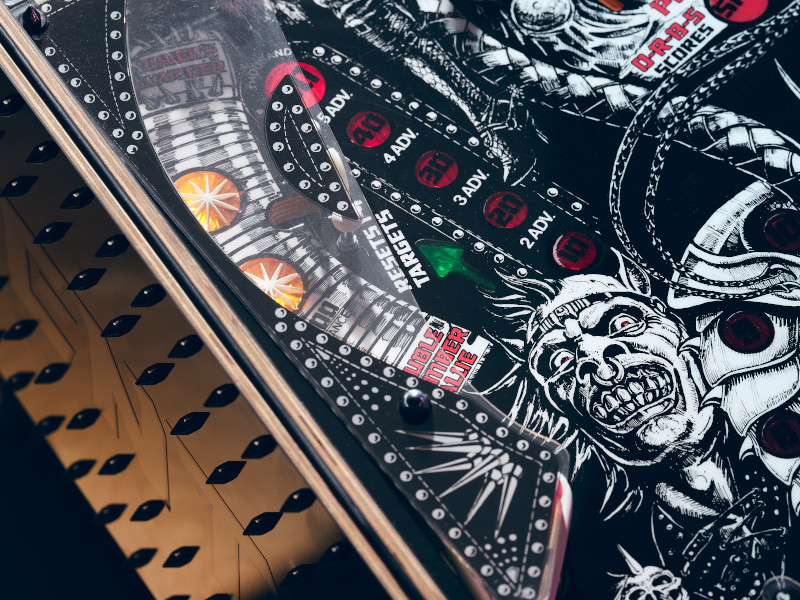
Even though the playfield was a clean reproduction, all the components were caked with dust, wires were frayed and blobs of solder were everywhere. I really underestimated this portion of the project which took me an additional month to compete. Everything was stripped from the bottom so I could give it a fresh coat of paint and start from scratch. I built a custom pinball rotisserie which made the restoration process bearable.

All the drop target and launch mechanisms were disassembled, tumbled in a polisher and coated with paint, or a clear protective finish. All of the electrical connections were resoldered and rerouted. Nitro Pinball supported the project by supplying all the replacement parts from their vast inventory. This includes all the reproduction circuit boards, fresh white rubbers, and a set of new pinballs to load into the machine.
All incandescent bulbs were replaced by high efficiency LED bulbs supplied by Comet Pinball. The new bulbs really brighten up the game and will save time on maintenance in the future.
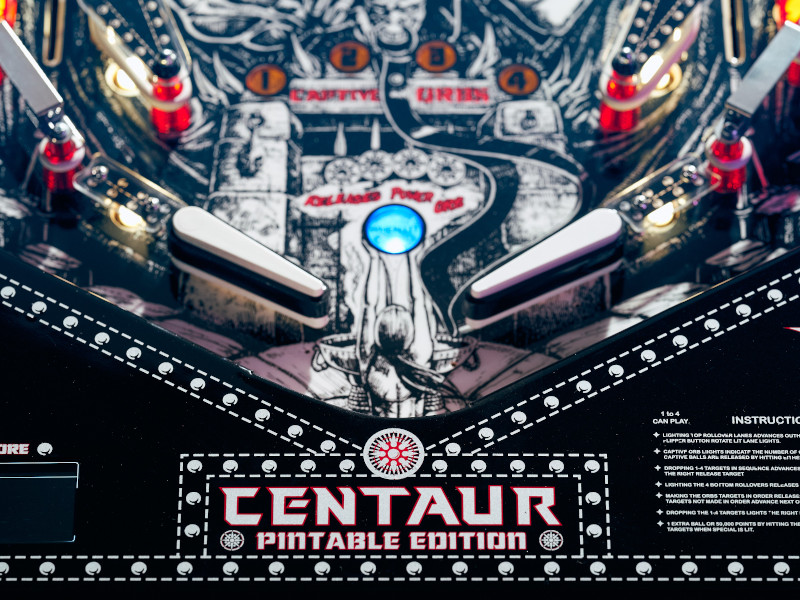
The drop targets were all in rough shape and the original design lacked a little something in my opinion. I decided to 3D print my own; incorporating the original font to make them feel at home.
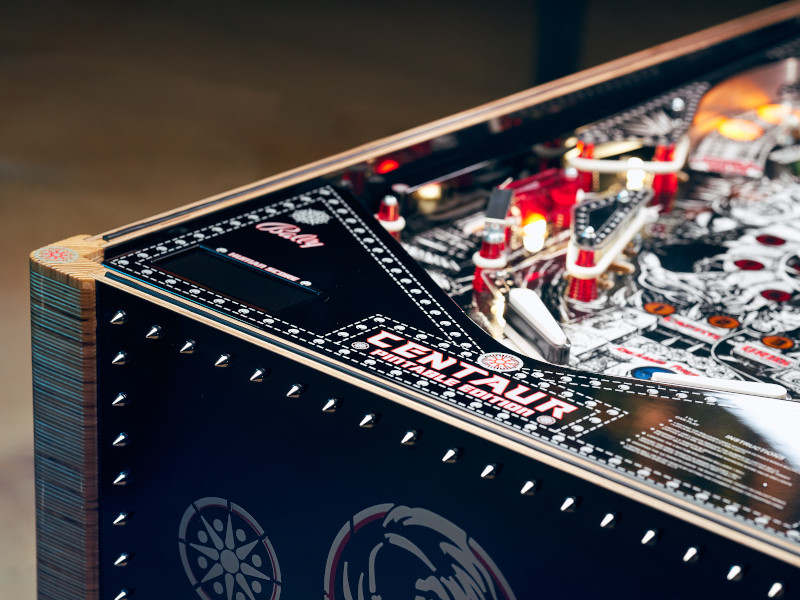
Apron From Scratch
A ton of effort was put into the apron. The original apron was tired and had large generic holes to hold some advertising and the instruction cards. I thought I could really improve this by adding a custom screen and increasing the width so as to cover the new auto launcher. The new apron steel was beefed up to 16 gauge steel, cut on a water jet machine and bent into shape by the Metal Mart fabrication shop.
Once fabrication was complete, it was dropped off for paint at a local auto body shop along with a bunch of new wooden playfield details that I had milled up in my shop.
The original cabinet and apron artwork was traced into vector files and then spun into the new apron artwork. Customrubontransfers.com supplied some really high quality, custom, two-tone decals for the apron. I was really impressed with these decals and how easy they were to apply. Once the decals were laid down, it went back to the auto body shop for another clear coat to seal the decals in.
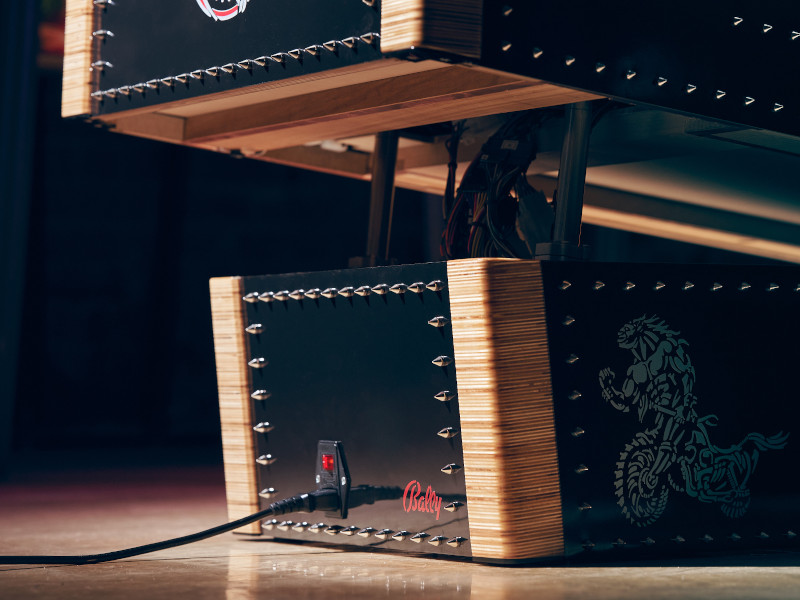
Cabinet Design
The base is welded up from 1/2″ x 1/2″ square mild steel tubing which has been powder coated in gloss black. The base houses two brushed stainless-steel drawers for all of the electronic boards. The drawers make servicing and troubleshooting a lot simpler as the electronics are much easier to access.

The speaker has been upgraded and mounted up front, facing the user, as opposed to the original downward facing position.
The cabinet is constructed from 5/8″ thick Baltic Birch plywood which has been laminated in gloss black Formica on both sides. The corners are made from stacked plywood, which were milled into a custom profile, before being dipped in epoxy for a glossy yet durable finish. The top edge of the cabinet has a channel milled into it that houses a silicone gasket. The 6mm glass was cut and polished by a local glass shop and rests on top under its own weight. The glass and gasket combination really helps keep the noise level down as well, pinball machines are crazy loud without any glass installed!
The playfield needs to hinge inside the cabinet to make the underside serviceable. The existing pivot screws were total junk, so I opted for a newer style pivot used in Stern machines. The metal pin for these new pivots slide in a custom track milled from a block of HDPE.
The existing manual ball plunger had to go, it’s literally shaped like a weapon at knee-height. To solve this issue, I repurposed the knocker solenoid – which I didn’t want anyways. The knocker solenoid basically shoots a metal rod at the side of the cabinet to notify the user that they were just awarded a free ball. Now, when a ball is ready to launch, the Teensy microcontroller grabs the shared sound, and the solenoid data bus (using a multiplexer) then instructs the Solenoid driver board to fire the knocker solenoid – which has been repurposed as a ball launcher and is now located underneath the custom apron.
The cabinet decals are inspired by the original cabinet artwork which are painted at the factory using a stencil. Wrap Guys took a break wrapping cars and printed me off some sweet custom vinyl transfer decals.

The original cabinet paint featured stencilled studs so I decided to replace them with actual chrome studs, 700 of them! I was able to find some “safe enough” looking ones designed for punking up leather goods. The bottom cover which is affixed with magnets features the longer red studs that double as a handle to remove the cover.

Taking Control
The firmware on the Teensy microcontroller is responsible for controlling all the new features including:
- Reading the FPGA to fetch the current scores.
- Displaying the scores on the 3.83” OLED using the U8G2 library with a custom driver.
- Reading the accelerometer during table lifting and lowering.
- Output to the dual H-Bridge for controlling the linear actuators.
- Reading the accelerometer for tilt and slam sensing.
- Navigating the settings menu using a rotary encoder mounted up front.
- Controlling the original shared data bus to trigger the sounds and solenoids.
- Reading the ball launch switch and lighting the skull LEDs.
- Simulating the switch presses for the original start button and tilt switch.
- Controlling Tetris mode.
- Monitoring for game start condition and displaying the splash screen.
- Diagnostics modes to aid in troubleshooting.
All these features are implemented as tasks and assigned to a task scheduler to keep the code efficient and clean.
Bringing it all Together
Project Pinball Coffee Table was a success in my books. It’s a concept piece that establishes a new aesthetic and form factor for a traditional pinball machine. The Pinball Coffee Table is surprisingly comfortable to play for a casual game, and could be a viable option as a home-use-only game.
More importantly, the knowledge gained from this project was huge and will stay with me for years to come. I’m truly grateful to all the project sponsors for chipping in and guiding me through some unfamiliar tasks. I’m happy to answer any Pinball Coffee Table related questions here and will be updating this post periodically with any design improvements.
Thanks for reading!

Hi Adrian,
This is simply brilliant!
Congratulations,
Mike
Adrian,
This is wonderful. It is funky, avant garde, controversial and looks like a whole lot of fun.
Congratulations and thanks for bringing life and joy into an older pinball machine.
Kim
Hi, Adrian.
I saw your video a few days ago, and just watched it again. I’m truly floored by this project.
Ages ago, my dad bought a pinball machine and it’s sitting in his basement, where it hasn’t seen much use for years. It’s a halfway decent game when it functions, called Laser Cue (Williams, 1984). According to Pinside.com, it has ‘an unusual “billiards in space” science-fiction theme.’ That pretty much nails the motif. It needs to be restored, and your project has got me thinking about doing that restoration. Unfortunately, I don’t have the acumen to do all the programming and electronics modifications that you’ve done, nor do I have a shop in which to build anything custom like the coffee table. However, I could probably manage to revive the machine in its current, original incarnation. That would be step one, at least—and it would probably require a rotisserie.
So, I’m curious: do you have any plans available for your project? Either for the electronics, the housing, the rotisserie, or all of the above? While I can capably wield a soldering iron, that doesn’t translate to knowing how to program a microcontroller or design a circuit board, but those are skills I’m interested in learning.
Again, great job. Truly an inspiring project by you.
Thanks Steve! It was a very large project for sure. I would tackle a pintisserie and basic playfield restoration first. That’s all very well documented online. I had a post on the pintisserie but pulled it down. The 3D printed parts for it are here:
https://www.thingiverse.com/thing:4671931
I don’t have any plans or source code available as it’s just too niche of an experiment that I would have to support.
Hi, Adrian. I appreciate the reply. I’ll follow that lead about constructing a pintisserie and restoring a playfield; do a little web sleuthing.
I totally get how the project is too niche of something to maintain for 3rd party perusal, but I’m curious: could you point me toward some comparable, foundational projects to try and surmount (i.e., tutorials to follow)? I’m looking for anything that would help build the kind of programming acumen that would help me tackle a project like this.
Thanks, either way.
Wow that’s a fantastic job you’ve done. I can’t even begin to imagine how many painstaking hours you spent on the project but the end result justifies them all. Truly amazing!