Creality CR10S-Pro Internal Fan Upgrade
Every CR10S-Pro owner knows the new stepper drives are amazingly quiet but the fans are out-of-control loud. Well there are 5 of them! This post will cover swapping out the three internal fans, using a temperature aware fan controller to speed up fans when things get hot. I can say this upgrade makes a very noticeable, audible difference!
Many have attempted this upgrade with my favourite being a video post from Nexi Tech. I mean, attaching the solid state relay to the nearby aluminum extrusion as a heat sink? yes please! everyone should do that.
The stock fans on the CR10S-Pro are as follows:
- 1 x 4020 24 VDC Axial – Mounted internally in the case
- 1 x 4020 24 VDC Radial – Mounted internally in the case
- 1 x 4020 12 VDC Axial – Mounted internally in the power supply
- 1 x 4020 24 VDC Radial – Mounted on extruder
- 1 x 4010 24 VDC Axial – Mounted on extruder
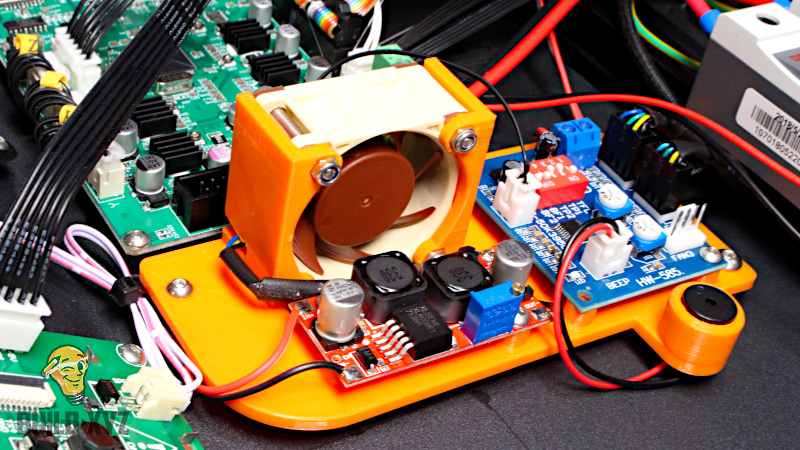
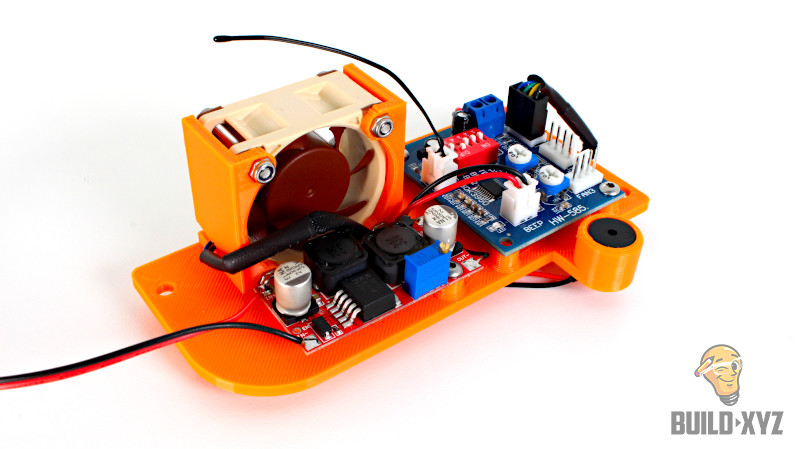
Lets get into what you will need to do this mod (Thingiverse file linked at the beginning of this post)
Parts List
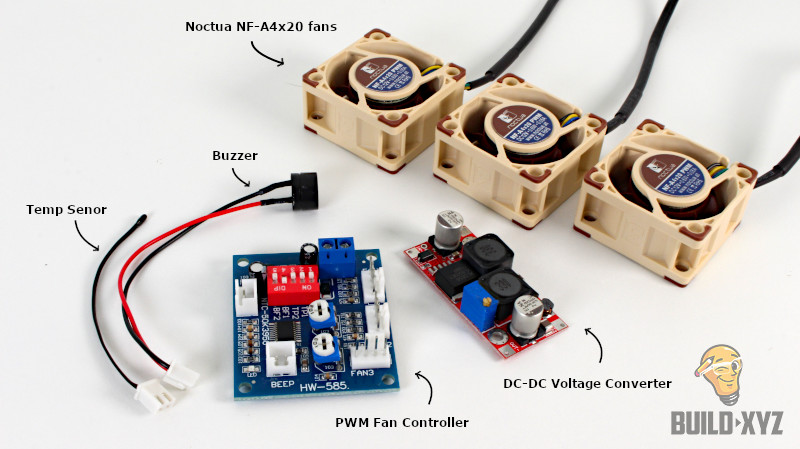
The three Noctua fans are model number NF-A4x20 with 4-wire Pulse Width Modulation (PWM) interfaces to allow for speed control. If you do not use the PWM feature such as when we install one in our power supply, the fan will operate at full speed when the power supply decides to turn it on.
The fan controller was sourced on EBay here. This controller has some pretty nifty features with a very low price tag:
- 3 x PWM controlled fan outputs with standard 4-Wire PWM connectors
- Buzzer (included) to notify if fans stop running
- Temperature Sensor (included) for accurate temperature sensing
The five onboard DIP switch enable certain features and are labelled on the circuit board:
- BF1 (Buzzer Fan 1) – Enable/disable the alarm for fan 1
- BF2 (Buzzer Fan 2) – Enable/disable the alarm for fan 2
- TFL – Set FAN1 minimum speed to %40 (instead on %20)
- TP1/TP2 set the temperature at which the fans start accelerating and what temperature the fans will reach full speed
|
The DC-DC converter can also be easily sourced on EBay here. Be sure to tune it first, this can be accomplished by powering the DC-DC converter input from the CR10S-Pro 24VDC power supply while adjusting the potentiometer until the DC-DC converter output reads 12VDC .
You will also need to fashion a harness for the new power supply fan (or use the FLX, non-PWM version fo the fan). I made the following harness from the provided connectors and the original power supply fan:

Assembly is fairly straightforward and I’m not going to cover any additional details here. Please leave any questions/comments/concerns here.
Thanks for reading!
I am going to attempt to do this mod and I am new to this. I ordered two fan controllers because I didn’t know how you controlled the fan for the power supply with the short lead of the temperature sensor. I assume that you put the motherboard fan on # 1 and the back enclosure fan on #2. Any extra information would be greatly appreciated. Also what settings did you use on the dip switches
Hi Jeff,
I did connect Fan 1 to the motherboard fan and Fan 2 in the rear mounted case fan.
I cannot remember every DIP switch setting but set them for the highest cooling possible as the system is still very quiet.
Heh. Much easier than my plan. I have all the parts to build out pwm controllers for all three fans using arduino mini pros or a pi zero using k type thermocouples for the cpu, case and psu. Have to admit I never thought to just search for a cheap pwm controller on ebay. Just building up my website and plan to add this and a couple of other builds to it when I get time.
This is a solid build and very elegant solution. I don’t see the Thingiverse link for your support plate. I like that design and hope to use that on my build, if possible.
Which support plate are you referring to?
This! https://www.thingiverse.com/thing:3728619
… and thank you for the great build guide. I’m in the process of putting it together now.
anyone going to do a step by step guide to completing this build …
would love to see how everything is connected and wired for a real nice tutorial, looking to upgrade mine in a near future.
Sorry, I just don’t have enough extra time to document beyond what is provided here and on Thingiverse.
Did you only use one dc-dc converter for the motherboard and the fan in the back? or do you have another dc-dc before the pwm controll board? would like to see a schematics of how you wire this. I´m planning to do this since it is sooo loud an the fans running all the time is to no use. where did you put the temp sensor?
Hi Patrick,
You only need one DC-DC converter to step 24VDC to 12VDC for the fan controller. The fan controller board with supply 5V PWM to the fans. I just used the stock temp sensor which is floating just above the fan controller board.
But you are connecting both 12v noctua PWM fans to this board? the one for the controller board and the one in the back of the case?
Anyone else done this mod and documented it?
Thanks Adrian for a nice mod, just trying to figure it out….
ended up not using the board since it didnt fit in my version with the bracket so I just used 2 buckconverters. but I really like this!
just finished doing this mod to my CR10s Pro V2. The mount at the thingiverse link wont work for the V2 so I just made a little mount to hold the fan controller and the buck converter I used. The case fan on the V2 is powered directly off the PSU but I just removed that and ran both fans from the control board. Works great and now the loudest thing on the printer is the hot end cooling fan!
Thanks for the update Adam! Nice work!
It fit my CR10s Pro V2, I just had to move the solid state relay to the nearby aluminum extrusion like both this article mentioned and shown on the YouTube video.
Hi Adam,
I too have the cr10s pro V2. Could I get your STL? I’m having a difficult time finding anything for this and I don’t really have the Time or knowledge to design my own get. I’d really appreciate it